Contents
Butler module - Recording
The crux of the data collector module is the Butler decorator class.
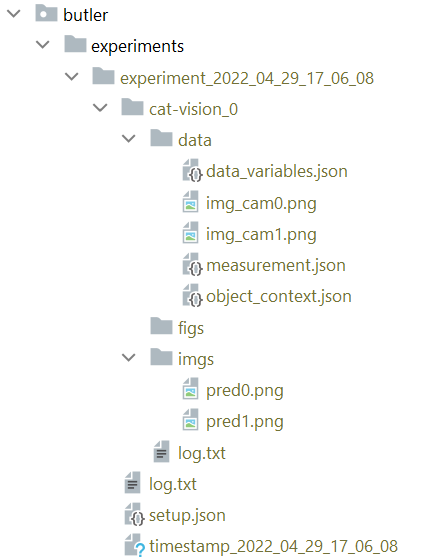
Butler enables users to record 'experiments' and organize them into a directory structure, see Figure 1, which can then be processed and uploaded to the server.

Figure 1. The directory structure that Butler generates upon being run once on a data function.
The simplest arguments with which the decorator can be called with are setup_file and data_variables.
A basic usage of Butler is shown in the next example. There is a data_variable plugged into the data_variables argument. This data_variable variable has to be visible outside of the scope of the my_data_function. In our case it has to be a global variable. Butler, like all decorators, only has access to the arguments and return value of the decorated function.
The "sensor_outputs" field in the data function's return value (ret) has the same function as Butler's data_variables=("data_variable", ) argument in this case.
The next example contains a sample usage of Butler. In this case we are decorating a divide function that is inside a TestClass. Note the self.data_variables is visible from Butler's perspective - Butler sees the divide function's input arguments, therefore the self is visible.
What is new here compared to the previous example is:
If you need the decorated data function to still return its original values, just add the argument output_variable_name (Line 6) to Butler.

Figure 1. The directory structure that Butler generates upon being run once on a data function.
The simplest arguments with which the decorator can be called with are setup_file and data_variables.
A basic usage of Butler is shown in the next example. There is a data_variable plugged into the data_variables argument. This data_variable variable has to be visible outside of the scope of the my_data_function. In our case it has to be a global variable. Butler, like all decorators, only has access to the arguments and return value of the decorated function.
The "sensor_outputs" field in the data function's return value (ret) has the same function as Butler's data_variables=("data_variable", ) argument in this case.
The next example contains a sample usage of Butler. In this case we are decorating a divide function that is inside a TestClass. Note the self.data_variables is visible from Butler's perspective - Butler sees the divide function's input arguments, therefore the self is visible.
What is new here compared to the previous example is:
1. On line 8: The keywords="[INFO]" argument, whose function you can read up on in the code.
2. On line 27: The add_object_context function, which, you, as a human, can fill out. The 'context' then acts as ground truth.
3. On line 38: Butler.add_tmp_files(r"../unused/tests/setup_cropped.png", "data", "pointcloud.png") - this copies the file "...setup_cropped.png" to the "data" directory (can be "figs", "imgs") and renames the source file to "pointcloud.png".
4. On line 40: Butler.add_measurement_png(r"../unused/tests/setup_cropped.png") adds the image just for context.
5. On line 43 & 46: We just add the gripper_pose & object_pose to get the grasp used in this measurement.
If you need the decorated data function to still return its original values, just add the argument output_variable_name (Line 6) to Butler.
Contents
Butler module - Formatting
When you have recorded some experiments in the format from the recording tutorial, you can then easily process those experiments using another script from the Butler module pipeline.py, or as you can see in the example below.
The above code snippet fills the upload_dicts/ folder with almost uploadable JSON dictionaries, see below or here: https://github.com/.../example_upload_dictionaries for some examples.
In the final uploading step of Butler's pipeline the following happens:
The above code snippet fills the upload_dicts/ folder with almost uploadable JSON dictionaries, see below or here: https://github.com/.../example_upload_dictionaries for some examples.
In the final uploading step of Butler's pipeline the following happens:
1. JSONs are searched through for any absolute references to files, e.g. /abs/path/to/file.png.
2. Absolute paths are replaced with the file names. E.g. "/abs/path/to/file.png" => "file.png"
3. The file bytes are loaded from the absolute file paths and added to the request's request.files attribute with the base name as the key, i.e. {"file.png": open("abs/path/to/file.png")}
4. The uploading happens. See here for the tutorial on how the uploading module works.